How to Build a Digital Wallet Product
Digital wallets are some of the most widely-used financial products today. This guide describes the bank and payments infrastructure underlying digital wallets and how you could build one using Modern Treasury.
Why Build a Digital Wallet?
Companies like Apple, Starbucks, Cash App, and Splitwise have shown that embedding wallet functionality into products unlocks new business models, improves customer experience, and creates more control over money movement. It's why Juniper Research predicts that over two-thirds of the global population (5.6 billion people) will have at least one digital wallet by 2029.
More product teams are choosing to bring payments in-house—either to control the user experience, reduce third-party fees, or enable features like balance-based spending and instant payouts. Wallets can help:
- Lower costs by moving funds over ACH or RTP instead of card rails
- Improve cash flow through balance preloading
- Increase loyalty and retention through faster, smoother payment experiences
- Centralize transaction data and simplify reconciliation
In this guide, we’ll walk through how to set up the core infrastructure behind a digital wallet. These steps cover the concepts of underlying architecture of a wallet, creating a ledger, provisioning user-level ledger accounts, connecting external accounts, and enabling money movement.
Considerations for Your Digital Wallet: Architecture
When building a digital wallet, the first technical decisions often revolve around banks, payment rails, and ledgers. But none of that matters if the user experience doesn’t work. For products that move money—especially wallets—it’s the user-facing parts that shape trust: signup flows, balance visibility, and payout timing.
Behind every good wallet UX is a robust payment ops setup. To support real-time balances, accurate reporting, and regulatory compliance, you’ll need to make key architectural decisions about how funds are held, tracked, and reconciled. Here’s how to approach building the payments infrastructure for a product like Pay2Day.
Step 1: Decide on the structure of your underlying bank account.
The most straightforward option would be to set up an FBO, or “For Benefit of,” account with your bank partner. An FBO account allows your company to hold and manage funds on behalf of their users, without assuming legal ownership of those funds—an important distinction when serving consumers or contractors at scale. Funds held in an FBO account are legally attributed to the end-users but operationally controlled by the platform.
An FBO account offers regulatory coverage, helping companies avoid the cumbersome process of becoming a money services business (MSB); though, this is another option. Instead, they can attribute ownership of the account to the bank’s EIN, or their tax ID, to avoid these regulations. Banks are de facto money transmitters, so they don’t have to worry about registering for a Money Transmitter License (MTL), a time-consuming process that varies from state to state.
Aside from regulatory coverage, businesses may also open an FBO account for insurance purposes. In some cases, you can have up to $250,000 in FDIC insurance on each virtual account under an FBO account. For neobanks, this gives clients a personalized experience with insurance benefits.
Step 2: Decide on a mechanism for issuing separate accounts for each user.
To isolate funds and enable direct inflows and outflows for individual users, you’ll want to issue virtual accounts (also known as subsidiary accounts or sub-accounts) under the umbrella of the FBO account (often referred to as the omnibus account). Each virtual account has its own account and routing number, making it possible to:
- Streamline incoming and outgoing transaction data
- Attribute incoming deposits to specific users
- Simplify reconciliation with unique identifiers
Virtual accounts function similarly to standard bank accounts. The most notable difference is that virtual accounts cannot actually hold money. They receive it, collect necessary information about the sender, and pass it over to the omnibus FBO account. It’s advantageous to pair them with a double-entry ledger to track all of your business transactions.
Step 3: Implement a Double-Entry Ledger for Tracking Transactions and Balances
A ledger is a timestamped log of events that have a monetary impact, ensuring:
- ACID compliance, including Immutability and traceability of transactions
- Clean audit logs for regulatory and accounting needs
- Accurate balances exposed to the end-user
Because the balance of your omnibus FBO account only reflects the aggregate balance held across all users, this ledger helps maintain accurate balances at the user (virtual account) level. These accounts are classified as debit normal or credit normal.
Transactions recorded in the ledger have two or more entries, which belong to an account.
- Entries change balances based on account type and entry direction.
- Debits—or entries on the debit side—increase the balance of debit normal accounts, while credits decrease it.
- Credits—or entries on the credit side—increase the balance of credit normal accounts, while debits decrease it.
- The system is correct if the sum of balances of all credit normal accounts matches the sum of balances of all debit normal accounts. This means all money is properly accounted for.
How can you apply this with software? To implement double-entry accounting in code, you’ll need:
- Ledger Object: Represents the entire system of accounts and transactions
- Account Object
- Has a normality: debit or credit
- Represents a balance bucket
- Transaction Object
- Contains two or more entries
- Must be balanced: debits = credits
- Entry Object
- Belongs to one transaction and one account
- Includes amount and direction (debit or credit)
Modern Treasury partners with several banks that provide FBO accounts with virtual account capabilities. With our Virtual Accounts API, you can:
- Programmatically issue accounts to users directly from your app
- Receive unique account/routing numbers per user
- Monitor deposits and activity in real-time
In addition, our Ledgers API, lets you:
- Create double-entry ledger accounts for every wallet user
- Post ledger transactions for deposits, withdrawals, and transfers
- Query balances and transaction histories
Understanding the UX: A Wallet User Flow
Let’s say you’re building a wallet called Pay2Day designed for gig workers: food delivery couriers, rideshare drivers, and other shift-based earners. Pay2Day’s value prop is providing access to earned wages daily, so gig workers don’t need to wait until the end of the paycycle.
To do this, Pay2Day integrates directly with partner marketplaces to access worker earnings data and prefunds corresponding amounts available. At the end of the paycycle, Pay2Day collects repayment from the marketplace to settle the funds they’ve advanced to the worker.
Here’s what the user flow could look like:
- User sign up: Wendy Worker signs up for a Pay2Day account, and connects it to her account for the gig platform she works for.
- KYC + account creation: Pay2Day verifies Wendy’s identity and tax information, then provisions a wallet account.
- Balance available: Pay2Day fetches verified earnings data on GoGrocery and deposits the corresponding amount to Wendy’s Pay2Day wallet.
- Funds access: Wendy can either initiate a withdrawal to her linked bank account, or spend directly from her Pay2Day balance.
Technical Requirements to Enable This Flow
To make the above experience work in production, you need to stitch together several financial infrastructure and payments capabilities directly into Pay2Day:
- Virtual account issuance: A partner bank must provide and manage virtual accounts to hold wallet funds.
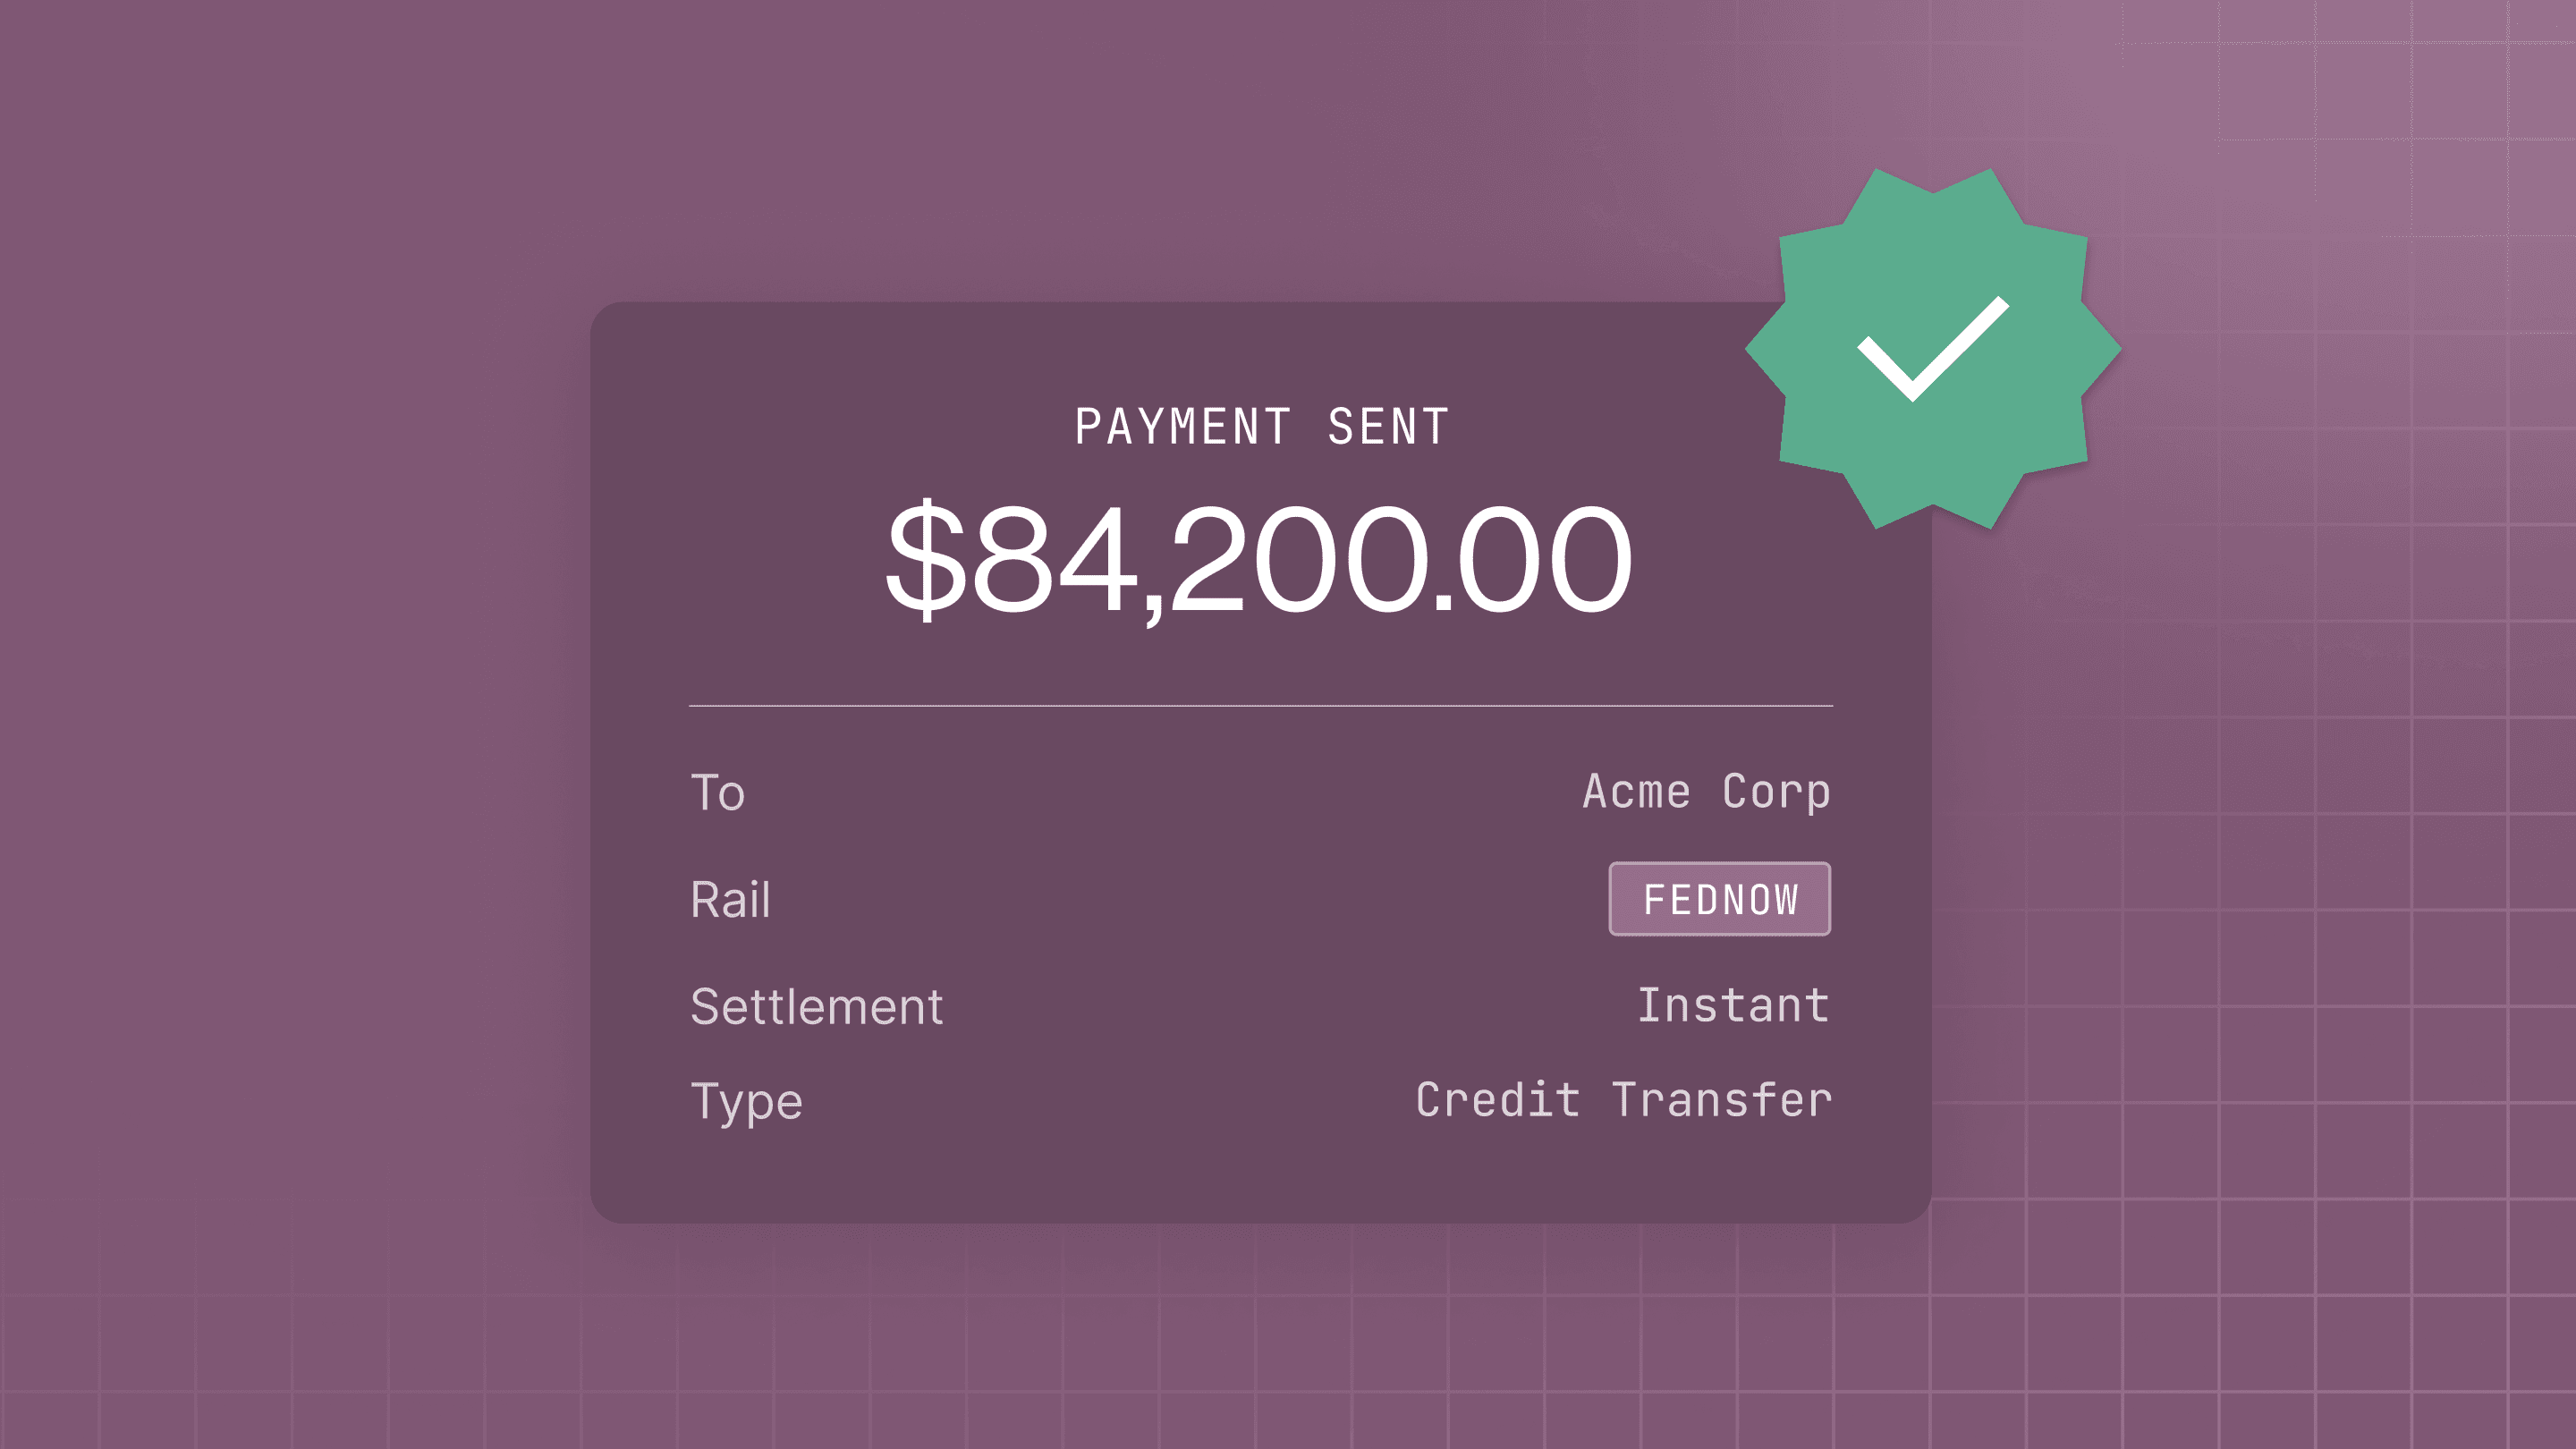
- Payout support: You’ll need to be able to send and receive money via ACH debit/credit, and possibly real-time rails such as RTP or FedNow.
- A double-entry ledger: Every wallet account must be backed by a ledger that logs debits, credits, and balance updates immutably.
- Balance calculation logic: Real-time account balances must reflect pending and posted transactions.
- Transaction reconciliation: Incoming and outgoing payments must be reconciled against bank statements accurately.
The infrastructure decisions you make here will shape your system’s performance, ledger consistency, and support for edge cases.
Principles in Practice: Setting Up Your Wallet's Ledger with APIs
Step 1: Set up Pay2Day’s Ledger
We’ll begin with a double-entry ledger. This ledger will include:
- Individual user accounts to track each user’s balance
- A shared cash account to track the funds cash held by Pay2Day.
We’ll restrict our setup to these two account types for the sake of simplicity.
To set up the Pay2Day Ledger, make the following API call to the Ledgers endpoint:
curl --request POST \
  --url https://app.moderntreasury.com/api/ledgers \
  --header 'Content-Type: application/json' \
  --data '{
    "name": "Pay2Day",
    "currency": "usd",
    "description": "General Ledger for Pay2Day account balances"
  }'
The response includes the ledger_id, which you’ll use throughout the setup process. You can also add metadata for tracking user types, regions, or internal IDs.
Step 2: Create a Ledger Account for Each User
Create an individual Ledger Account for each Pay2Day user. In this example, we’re creating a ledger account for Wendy Worker; you’ll make a request to the Ledger Accounts endpoint:
curl --request POST \
--url https://app.moderntreasury.com/api/ledger_accounts \
--header 'Content-Type: application/json' \
--data '{
"name": "Wendy Worker",
"description": "Ledger account for user Wendy Worker",
"normal_balance": "credit",
"ledger_id": "89c8bd30-e06a-4a79-b396-e6c7e13e7a12"
}'
Note that you need to provide the ledger_id from Step 1. Use the normal balance: “credit” to indicate account normality, because the funds you (Pay2Day) hold on behalf of the user is considered a liability. Also note that the normal balance is set to credit, since cash you hold on behalf of the user should be treated as a liability.
You can learn more about the conventions around designating accounts as assets or liabilities from our primer, Accounting for Developers.
Step 3: Create a Cash Ledger Account for Pay2Day
Track total cash held by your platform with a dedicated debit-normal account. This account will be updated whenever there are deposits and withdrawals from an individual user’s account.
Again, make the request to the Ledger Accounts endpoint that includes the same ledger_id:
curl --request POST \
  --url https://app.moderntreasury.com/api/ledger_accounts \
  --header 'Content-Type: application/json' \
  --data '{
    "name": "cash",
    "description": "Ledger account for cash held in Pay2Day",
    "normal_balance": "debit",
    "ledger_id": "89c8bd30-e06a-4a79-b396-e6c7e13e7a12"
  }'
Step 4: Create a Counterparty for Each User
A Counterparty represents any external individual or business that you transact with. Creating a counterparty makes it easy to withdraw from or deposit funds to the external bank accounts used by Pay2Day users. To create a new counterparty object for Wendy, make the following API call:
curl --request POST \
  --url https://app.moderntreasury.com/api/counterparties \
  --header 'Content-Type: application/json' \
  --data '{
    "name": "Wendy Worker",
    "email": "wworker@workermail.com"
  }'
The response includes a counterparty_id to associate with their external accounts.
Step 5: Create a Virtual Account for Each User
This is the last step required to enable users to store funds within your wallet on Pay2Day. Virtual Accounts enable users to receive and send funds via their own unique routing and account numbers.
Link each Virtual Account to the user’s Counterparty and their credit/debit Ledger Accounts.
curl --request POST \
  --url https://app.moderntreasury.com/api/virtual_accounts \
  --header 'Content-Type: application/json' \
  --data '{
    "name": "wworker",
    "internal_account_id": "f7b2fc7a-3f22-4f82-b651-fa9e2f8d2653",
    "credit_ledger_account_id": "f1c7e474-e6d5-4741-9f76-04510c8b6d7a",
    "debit_ledger_account_id": "e2f8g871-f6d3-4340-9c75-04510c8b6d7b",
    "counterparty_id": "928db55e-6552-4aaf-96d7-10c693922b1f"
  }'
Modern Treasury will automatically create ledger transactions for incoming and outgoing payments, updating the correct user and platform accounts.The balance of each account will be updated automatically so that it can be exposed to the user within the Pay2Day app.
Step 6: Create a Payment Order When a User Withdraws Funds
When Wendy wants to access her daily earnings, you’ll need to create a Payment Order to move funds from the external bank account Pay2Day is using to fund wage advances.
For the sake of simplicity, we’ll use ACH as our payment method, but this flow would look similar with RTP, FedNow, or other rails:
curl --request POST \
  --url https://app.moderntreasury.com/api/payment_orders \
  --header 'Content-Type: application/json' \
  --data '{
    "type": "ach",
    "amount": 30000,
    "direction": "debit",
    "originating_account_id": "2e0296c1-1daf-4b3e-954d-fb9ec7be56f6",
    "receiving_account_id": "004e664f-98ab-4606-8b05-c282a3430034"
  }'
You can use webhooks to track payment status and query the Ledger Account Balance endpoint to update in-app displays in real-time
That’s the high-level flow: set up a ledger, issue accounts, link to external rails, track and reconcile balances.
Get Started
This guide outlined a simple but robust approach to designing a digital wallet product. For any specific questions about a product you are building, or to see how Modern Treasury can help, reach out or sign up today.
Get the latest articles, guides, and insights delivered to your inbox.
Authors


Chris Frakes is the Head of Content, Brand Marketing, and Communications at Modern Treasury. She likes to write and edit pieces that help demystify complex products. She's formerly a journalist, banker, and consultant, and has over a decade of experience in fintech.