Stablecoin Payment Accounts are here.Request Early Access →
How to Build a Digital Wallet Product
Digital wallets are some of the most widely-used financial products today. This guide describes the bank and payments infrastructure underlying digital wallets and how you could build one using Modern Treasury.

Introduction
Digital wallets are some of the most widely-used financial products today. In the United States, apps like Venmo, Zelle, and CashApp have been instrumental in the shift from cash to digital payments. Peer-to-peer transaction volumes on digital wallets are growing rapidly and are projected to hit $478 billion in 2021.
At its core, a digital wallet allows a user to make and receive payments and store cash balances. They can either operate within a closed loop system, where the user has to first link an external bank account to move money into the system, or an open loop approach, where each wallet has a public account and routing number that can directly receive cash over a payment method like ACH.
In this guide, we’ll describe the bank and payments infrastructure underlying digital wallets and show how you could build one using Modern Treasury. We hope it helps demystify how a product you likely use every day works.
The User Experience
Let’s say you’re building a service called DashApp that allows gig workers like food delivery and rideshare drivers to get paid daily instead of waiting till the end of the paycycle. DashApp partners with marketplaces and platforms to view worker earnings and makes the corresponding amounts available to them in their DashApp account. At the end of the paycycle, DashApp receives the worker’s earnings from the marketplace to cover the funds they’ve advanced to the worker.
The user experience might look something like this:
- Walter Worker signs up for a DashApp account and connects it to his account with the delivery marketplace.
- DashApp verifies his identity and tax information before issuing a wallet account.
- DashApp checks earnings data in his marketplace account and deposits the corresponding amount in his DashApp account.
- Walter can either withdraw the funds to another bank account or directly spend them using DashApp.
In order to build this, you would need to integrate the following bank infrastructure and payments capabilities directly into DashApp:
- A bank partner to issue virtual accounts and hold funds.
- Payment initiation and receipt over ACH with those bank accounts. You might also need RTP payments.
- A double-entry ledger for tracking transactions and balances on each bank account.
- Real-time payment status and account balances in the mobile app.
- A method of reconciling deposits and withdrawals initiated by users to bank statement transactions.
At scale, you’ll also need to integrate with an ERP or accounting system to streamline closing your books at the end of each accounting cycle. For the sake of simplicity, we’ll leave that out of this guide.
Payment Ops Architecture
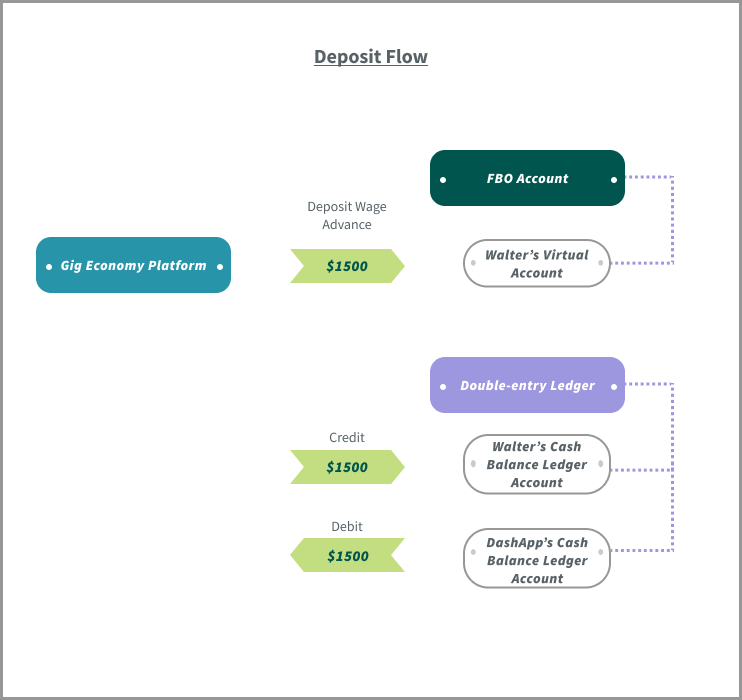
Start by deciding the structure of the underlying bank account. The most straightforward option would be to set up an FBO, or ‘For Benefit of,’ account with your bank partner. Using an FBO account would allow DashApp to manage funds on behalf of their users without assuming legal ownership.
Next, you need a mechanism for issuing separate bank accounts to each user. The best option here is to use subaccounts, more popularly known as virtual accounts, that can be created within the FBO account. Virtual accounts have unique account and routing numbers that allow them to send and receive funds from accounts at other banks. However, these funds are ultimately held in the FBO account. Virtual accounts also simplify tracking and reconciling transactions.
Finally, set up a double-entry ledger to track transactions and balances held in each virtual account. The FBO account will only show the total amount held across all users’ virtual accounts. Ledgers are a critical component of digital wallets because they minimize errors and fraud and help with auditability, ensuring users always see the correct balances and transactions in DashApp.
Modern Treasury partners with several banks that provide FBO accounts with virtual account capabilities. With our Virtual Accounts API, you can programmatically issue accounts to users directly from your app. Using the Ledgers API, you can set up a double-entry ledger for DashApp to programmatically create ledger accounts for each user and add ledger transactions for each deposit or withdrawal.
API Calls and Timings
Now that you’ve decided on a payment ops architecture and identified the APIs needed, you’re ready to build.
Step 1: Set up the DashApp Ledger
The first step is setting up a double-entry ledger. This ledger will include individual accounts for each DashApp user to track their account balances and a separate account to track the total cash held in DashApp. In this guide, we’ll restrict our setup to these two account types for the sake of simplicity.
To set up the DashApp Ledger, make a request to the Ledgers endpoint as follows:
The response includes the name you just provided, the currency used to denominate the accounts, the description, and most importantly, the ledger ID — you’ll need this in the next step. You can also tag custom information using the metadata field to provide more context in your code.
Step 2: Create a Ledger Account for each Worker
Next, create a Ledger Account for Walter in the ledger you just set up, and repeat this for each new user that signs up for DashApp. To do so, you’ll make a request to the Ledger Accounts endpoint as follows:
Note that you need to provide the ledger ID returned from Step 1, as well as a unique name for this Ledger Account. Also note that the normal balance is set to credit, since cash you hold on behalf of the user should be treated as a liability. You can learn more about the conventions around designating accounts as assets or liabilities from our primer on double-entry accounting.
You can again include metadata to add more context to this account, such as an internal user ID or a user type.
Step 3: Create a Ledger Account to track total cash held in DashApp
Now create a Ledger Account to track the total cash held in DashApp. This account will be updated whenever there are deposits and withdrawals from an individual user’s account. You’ll need to make a request to the Ledger Accounts endpoint that includes the same ledger ID, like you did in Step 2:
Note that the normal balance is set to debit, since the total cash held by DashApp should be treated as an asset.
Step 4: Create a Counterparty for each Worker
Creating a Counterparty for each worker makes it easy to manage the external bank accounts used by DashApp users to withdraw or deposit funds. In the Modern Treasury API, a Counterparty is any external individual or business that you transact with.
You’ll need to make a request to the Counterparties endpoint to create a Counterparty for Walter:
The response includes the name and email address provided, and a unique ID.
Step 5: Create a Virtual Account for each Worker and link it to their Counterparty and Ledger Account
This is the last step required to enable your users to store funds within DashApp. You’ll need to create a Virtual Account for Walter, and link it to the Counterparty created in Step 4.
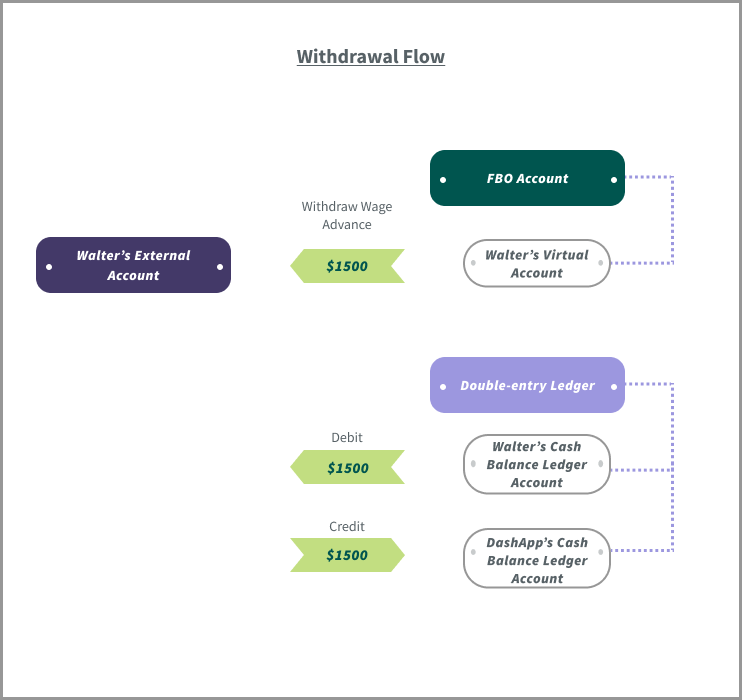
Then, you’ll need to link it to two Ledger Accounts — one account that is credited when money enters and another that is debited. When money enters the Virtual Account, Modern Treasury automatically credits the user’s balance and debits the FBO’s cash balance, and vice versa when money is withdrawn from the account .
Finally, you will also need to provide the ID of the Internal Bank Account that owns these Virtual Accounts:
With this setup, whenever Walter decides to withdraw his earnings for the day, Modern Treasury will automatically create a transaction within his Ledger Account and the Ledger Account used to track total cash. The balance of each account will also be updated automatically so that you can easily display it to the user within DashApp.
Step 6: Create a Payment Order when a Worker opts to withdraw their earnings for the day
To provide Walter access to his daily earnings in the Virtual Account you just set up, you’ll need to create a Payment Order to move money into it by debiting the external bank account DashApp is using to fund wage advances. For the sake of simplicity, let’s also assume that ACH is the only payment method you’re using.
To do so, make a request to the Payment Orders endpoint as follows:
Finally, use webhooks to track the status of the transaction and poll the Ledger Account Balance endpoint to check the latest balance once the transaction completes, before notifying Walter in the DashApp that his funds are available to use.
That’s it. You’ve successfully built a sophisticated digital wallet product that can store cash balances and make and receive payments. While there are more complexities involved in building in real life, we hope that this guide provides a useful foundation as you think about developing a wallet product or adding similar features to your existing products.
What Can Go Wrong?
Payment Operations software like Modern Treasury provide a number of tools to help you monitor and debug your payment flows. While we’ve covered a handful of happy paths in the steps above, building an actual digital wallet product can be prone to a number of issues.
For example, you may need to take corrective action if there’s an error in calculating Walter’s earnings. Since the Ledgers API is immutable, it’s impossible to delete erroneous transactions. The only way to make the correction is to initiate new Payment Orders that adjust the funds withdrawn to the right amount. By ensuring that transactions can only be added to Ledger Accounts and never removed, errors are easy to identify and account for.
You may also have to return unexpected debit transactions initiated against a user’s wallet. We provide an API for initiating returns, allowing you to provide this functionality to users directly in the wallet.
The Modern Treasury web application also lets internal teams track payments without checking code. They can see amounts, originating and receiving bank accounts, counterparties involved, and payment status as soon as a payment is initiated by your app. Learn more about how customer support and operations teams use Modern Treasury in this guide.
Get Started
This guide outlined a simple but robust approach to designing a digital wallet product. For any specific questions about a product you are building, or to see how Modern Treasury can help make your company’s payment ops simple, scalable, and secure, reach out or sign up today.